Monday, July 20, 2015

A finish and a bit of weaving...

I mentioned in my last post that I was very close to finishing a project a started years ago. Well...here it is!


It is One Nation by ByGone Stitches. The flag stripes are the 50 states in the order they joined the Union. It's a big one and now has a home on one of our walls. I purchased this chart because I was in a shop that had it framed and waiting for a customer to pick up. I actually walked right by the chart on display, mostly because the photo on the front was pretty dull looking. Hopefully my photo shows it off a little better!

I needed to finish this because I had scheduled a four week beginning weaving class with the Weavers Guild of Minnesota. That class is now complete and I can show you what I accomplished.

This is my first piece. It was completed on a rigid heddle loom I borrowed. The loom had issues (as did the weaver!) and the piece is a little wonky. I decided to not correct my mistakes but to leave them in.


I have a large Beka loom I purchased from a friend a couple of years ago, but wanted to do my next project on something a little smaller. Sooo... I purchased a 15 inch Cricket loom from The Woolery along with an extra heddle.

I found a book at the library that is full of patterns just for the rigid heddle loom and decided upon a log cabin pattern. Instead of using the same two colors in both the warp and weft, I chose two different combinations of dark and light to give it a more subtle look. So far I think it is going well and isn't as wonky looking as my first attempt.


The biggest issue I've had so far is knowing how much yarn/thread I will need to wind on my shuttles. I found this handy calculator online at Weavolution. If you fill in the blanks it will tell you how much you need for both warp and weft and is mostly math free for those who dislike using a calculator. The only calculation you may need to do is to figure out the yards per pound of the yarn/thread you are using, and that is a pretty easy calculation.

Will I become a master weaver? Probably not, but I do enjoy the process and have a few other projects in mind. So far I've used only a 3/2 perle cotton, but plan to explore other, finer thread options.

Next time...the other class I took at the Weavers Guild with a friend.


Thursday, April 16, 2015

EGA Projects

Some of you may remember that I am working on the Master Craftsman for Counted Thread, which is an EGA program. There are Master Craftsman programs for a  variety of techniques. They have recently posted the requirements for Step One of each program. Click on this link to learn more.

I finished Step One awhile ago and had put Step Two, Assisi, on the back burner. Well, I finally completed it and it has been evaluated and returned to me. I passed, so my next step will be Blackwork. It may take me awhile to finish that one as well!

I started with a photo a took of the Sanibel lighthouse a couple of years ago.


With a bit of artistic license I came up with this design done in the Assisi style.

I also completed two Group Correspondence Courses through EGA. More information can be found at this link.

The first was a course that was retiring and I wanted to take it before it was no longer available. It is an Italian drawn thread piece called Angelina. It has been sitting folded up for a few months so is pretty crinkly.


The second is a Teneriffe piece I just finished. I've been keeping it in a plastic CD case so it is still in pretty decent shape!


Next week is our Heartland Region Seminar. I will start two new projects while there. We'll see how long it takes until I finish those!

Tuesday, February 10, 2015

Valentine Freebies!

I was online looking for something completely different and found a few free Valentine projects you may enjoy. If you are speedy, you may have them finished by Saturday!

The first one is a quick to stitch quilted heart from Nancy Zieman. You can check out Nancy's blog here.


It is a paper pieced pattern and Nancy provides a quick tutorial on the technique.

Next up is from one of my favorite blogs...Mary Corbet's Needle 'n Thread. If you haven't already checked it out, be sure to go there and sign up for her email.  The Love embroidery can be found here.


And, one more embroidery piece. This set of paisley hearts should be quick to stitch and looks really nice in overdyed floss.


The last three patterns are for cross stitch pieces. As a policy I do not post photos of actual charts so you will need to follow the links to see what they are!

First is a darling Quaker Heart from Tempting Tangles. The link will take you to the Wichelt website, but for more on Deb's designs please check out her Tempting Tangles website. 

There is another small Quaker style valentine on the Embroiderbee blog. She offers a number of other free patterns as well.

Last, but not least, is a lovely valentine from Stitching the Night Away, another blog well worth your time!

Tuesday, January 13, 2015

New Year...Big Project Finished!

The last couple of months were quite hectic at our home. We had a slight issue when our new gas fireplace started a fire in the exterior wall of our new home. Everyone is fine and the restoration process continues at a snail's pace.

Fortunately I had finished, and delivered, a big project I had been working on for my brother and his wife to give to their first grandchild. They had saved their daughter's baby clothes with the plan to make a quilt when she had her first child. I was able to participate in the gift by creating a scrap quilt from that clothing.

If you have a similar project in mind this may be helpful to you.

I started with the bag of baby and toddler clothes.


Baby clothes are made from a variety of fabrics, many of them stretchy and of varying weights. They also are small, so between the many seams and baby stains, the usable pieces are limited. I decided the perfect answer to finding a quilt pattern that would work was to search my scrap quilt books. I found a basic pattern that I liked and then modified it to fit what I wanted for the end product.

I decided to use a pattern that incorporated a variety of blocks. All were cut to a 6.5 inch size with a quarter inch seam allowance. For the super stretchy fabrics I made a foundation base of a plain white cotton and marked the strip lines. This allowed me to cut those stretchy pieces...


...and then pin them down and sew them without a lot of movement.


There were some awfully cute parts to some of the clothes that I decided could not be cut apart or left out, so I made some blocks that were either a full 6.5 inch cut of fabric, or as in this example, I cut out the bibbed part and then stitched it onto a piece of white cotton.


One additional block I used was to cut a heart shaped piece of fabric, center it on a 6.5 inch piece of white cotton and machine applique the heart. You can see those blocks in this photo. I used the same white cotton for the triangle setting blocks.


I really wanted to include hand quilting, but you can imagine what it would be like to hand quilt through the fabrics found in baby clothes! So, I compromised and machine quilted in the ditch between all of the blocks.


Then, I hand quilted in the borders and in the triangle setting blocks.


There were several t-shirts that I wanted to include but they were too large for the 6.5 inch blocks, so I incorporated them into the backing. You will see that I made sure to position them where there would be machine quilting. Hand quilting through t-shirt fabric would have been difficult! You will see in the lower right hand corner the quilt label. Always remember to include one on any quilt you make.


And here is the finished product!


My brother and his wife saved the clothing for their other two children as well, so I look forward to those future projects!


Monday, October 6, 2014

And...I'm back!

Had you thought I disappeared? No, I'm still here!

I've made my move to my new home and over the last few months have had family visiting. Remember how I was trying to really go through my stash and get rid of things? I had the builder recreate the sewing room from my old house, shelves and all. Funny, but even with a slightly wider closet and getting rid of what I thought was a lot of stash, I still find that my shelves are brim full.

In addition to moving and enjoying family visits, I was able to finish a model for Northern Expressions. This is the link to her blog post when it was released this summer. Just scroll down to read about Shades of Red. Here's a quick photo I took before sending her off to the designer:


I've also been keeping very busy as the chair of the EGA Heartland Region 2015 Spring Seminar. We just announced our classes this weekend. You can see photos of the class projects and download registration information on the St. Paul Needleworkers website. Just follow this link.

Here are a few photos of just some of the ten projects:

Abalorios Azul taught by Deanna Powell

Black Magic taught by Celeste Chalasani

Grace taught by Terri Bay

Dresden Doodle taught by Marion Scoular

Jasper taught by Toni Gerdes


Next time I will finish my update on Sampler Symposium, though I imagine at this point it is more of a historical piece than an update!


Sunday, March 9, 2014

Sampler Symposium 2014: Part 1

As I mentioned in my previous post, I had the opportunity to attend The Attic's Sampler Symposium in January. The Attic was my LNS when I lived in Mesa many years ago. Over the years it has moved a couple of times and morphed into what I consider to be the premier shop for samplers and high count stitching.

This year's symposium began on Friday evening and continued until Sunday afternoon. We were treated to wonderful lectures and also had some great instruction on a couple of special projects.

One of our presenters was Claudia Dutcher of Dutch Treat Designs. She is the proud owner of  a sampler from the Bristol Orphan House in England. She lovingly charted a reproduction of the Emma Sanford 1867 sampler which can be purchased through your local shop or at The Attic. As participants in the symposium we received a copy of the chart. I then purchased the 52/60 fabric and Tudor silk to stitch it. I like the way the ladies at The Attic mark your purchase so you can remember exactly why you have that particular piece of linen. My piece has not only the name of the sampler I will be stitching, but it also indicates which side is the 52 count and which side should be vertical.

Below is the original Emma sampler along with the start of  a stitched reproduction using Tudor silks on the same linen I purchased.


I find the story behind these "orphanage" samplers to be quite fascinating. The orphanage was started by George Muller who never asked for payments or donations to care for the children, but rather prayed for the money to come in. The girls needed to learn a variety of skills that would help them in their likely future in domestic service. The boys learned a trade but still were required to knit 3 pairs of socks before they left the orphanage. These samplers were done mostly in red, but you can find some stitched in blue. There are rare examples completed in multiple colors. You can read much more about the Bristol samplers history on the Fitzwilliam Museum website by clicking this link.

One interesting tidbit Claudia shared is that sometimes you will see numbers on the Bristol samplers. These numbers represent the bed number and orphan number of the stitcher. There were hundreds of children who lived at the orphanage. It makes you wonder where all those samplers ended up.


Monday, January 27, 2014

Well into a new year...

Yes, it has been some time since my last post. Between getting our current home ready to sell and all of the appointments needed for the home we are building, I have had barely a spare moment.

I want to share with you a couple of things that I've found while looking for other, completely different things. Funny how that happens!

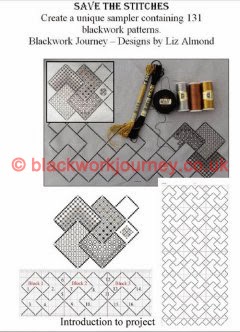
First, there is a new  blackwork stitch-a-long project over on Elizabeth Almond's site. Follow this link to her page of freebies which includes the Save the Stitches project. Once there you will be able to download all of the information for the project directly from her site. Looks like a good one for all of you blackwork fans!


As you know, I am a fan of Craftsy. Because of that I get their emails and those sidebar ads for new classes. One that I just signed up for is FREE and might have some appeal to those of you who aren't confident in your color theory skills. It is called Block of the Month 2014:Craftsy Color Theory. Follow this link and sign up for FREE! You will need a Craftsy account, which is also free.

The class is sponsored by Michael Miller Fabrics so you will see an option to purchase a fabric bundle from them, but it isn't required. There are nine video lessons that cover various color theory topics. It isn't an exhaustive study but a nice introduction.


Now, to whet your appetite a little... I was at The Attic's Sampler Symposium recently and have a lot to share with you!

Friday, November 29, 2013

Black Friday Freebies

Today is Black Friday and everyone is looking for a deal. Here are a few links for free projects that are perfect for your last minute needlework gifts.

The first is from Marilyn Leavitt-Imblum. You will recognize her work under several names: Told in a Garden, Butternut Road, Lavender & Lace. Sadly, Marilyn passed away last year but this page of free angel designs that are perfect as ornaments is still available. I would download the ones you are interested in because there is no guarantee they will be there forever. If you want to see what these look like stitched up, scroll a little down the page and click on Designs Stitched on Paper.


Next is a series of pears posted on the Samplers and Santas blog. There are pears for every season, including Christmas. She even provides a pear template to help you when you finish the piece.


Blue Ribbon Designs is offering several free sampler style Christmas ornament charts. Be sure to download the ones you want because she does "retire" them. Click on this link and then click on Freebies on the left hand side bar.


DMC has Twelve Weeks of Free Holiday Ideas on their blog. Be sure to click on the various links next to each photo as there are several projects each week. The projects cover a variety of holidays as well as a variety of needlework techniques.


Kreinik is also providing free projects each week on their website. Just follow this link and check back each week for updates.

Last, but certainly not least, if you enjoy embroidery and are not already subscribing to Needle 'nThread, please check out her blog post for several free Christmas embroidery patterns.

That should keep everyone busy until at least Christmas!

Sunday, October 27, 2013

Downsizing...

Yes, I know it is somewhat overused, but that is exactly where I am right now. You see, a few months back a builder we had worked with in the past came in and did a bid on updating the bathrooms and doing an overhaul on our kitchen. The design they did was gorgeous but involved a LOT of tearing up and reconstructing. And, the price tag was more than we paid for the house a little over 20 years ago. Well, let's just say we started thinking, which I know is dangerous, and wondered if we should take a different approach.

We live on the far north side of a large metropolitan area. Our son and his family (translated- two of our grandchildren!) live on the far south side. I am fortunate to be able to take care of the children for a number of weeks during the school year but the commute is long...over an hour one way when the traffic is good, and it rarely is.

Soooo... we decided to downsize, sell this place and move to the south side. If you are a stitcher you know where this is heading! Yep. I need to go through my stash and carefully think about what I want to keep.

Over the years I have cleared out my sewing room. I've gone through magazines, kits, fabric, etc., but I still seem to have a lot of things hanging out in that room. Things I couldn't possibly finish should I live to be 150 years old! How do I do this? How would you do it?

I started first by taking a long hard look at my magazine collections. Recently several publishers have offered back issues in digital form. Just Cross Stitch has a 10 year collection on one CD, and it includes the ornament issues. I purchased the CD and have now cleared up quite a bit of shelf space.


I also did this for my Piecework collection. They don't offer as many issues on one CD, but it is still a great space saver.


The one magazine that is available in digital form that I can't bring myself to replace is Sampler and Antique Needlework. I really enjoy flipping through those and reading the articles and doing it on a laptop just isn't the same.


I then went through the remaining magazines and (now don't hyperventilate!) ripped out the projects I really saw myself doing one day and then I recycled the rest of the magazine. I purchased those plastic sleeve protectors, placed one project facing the front and one facing the back, and put the sheets in a three ring binder. I have a binder for Quilting, Hardanger, Tatting, Needlework. I also have one that includes a variety of interesting articles I want to read or refer to later on. 

I did save some complete issues, but this process cleared out a lot of shelf space and that translates into not needing to box and move them later!

I still have a lot of cleaning out to do. The home is being built and we won't move until late April or early May. Still, it's a large task. Hopefully this downsizing process will help me focus on what I truly want to spend my time stitching on.


Thursday, October 10, 2013

A quilted yurt

While at the Quilt Expo in Madison, I came upon a quilted yurt. I had never heard of a yurt, let alone one that is quilted. A yurt is basically a tent like structure that was used by nomads in Central Asia. You can read more about them at Pacific Yurts and Wikipedia. (No, not everything on Wikipedia is true but this article does have a variety of yurt photos that are interesting.)

The quilted yurt I saw was a project by the Wisconsin Museum of Quilts & Fiber Arts. You can read more about the project and the current Yurt Challenge at this link.

The current yurt has been on display at the museum and other venues. You can see that it isn't large, but is very nice and cozy.


The quilts both inside and outside the yurt are all very different and fun to look at. I think this is really a doable project, especially if you know someone who is handy and can build the frame for you. All you would need is to cover it simply with fabric and add your own wall quilts. Or, why not have your own challenge and invite your friends to create a quilt? If that sounds like something you would like to tackle, you can find yurt building instructions at this link.

Thursday, October 3, 2013

A Few Online Freebies...

Yes, I know I promised Part Two of the Quilt Expo, but I wanted to let you all in on a few fun things I found online!

First, if you like quilting and embroidery and do not already subscribe to the Little Bits of This & That blog, you should! Sherri just finished up a Mystery Monday project and has posted the free pattern and instructions on her blog. Click on this link and then scroll down for the various parts. If you click on the links on the right hand side of the page you will find other Mystery Mondays projects.


If you enjoy cross stitch and/or the offerings of Plum Street Samplers, you won't want to miss Paulette's free mystery project, Mary's Sampler. Each Sunday she will post a new part to this Christmas piece. She offers two versions, one is a little more densely stitched. Follow this link and keep scrolling to catch up on all the parts. It began on September 29 and runs for 9 Sundays, finishing up just before Thanksgiving.


Another "one piece at a time" project I found is from Needles at Work. This is a 'Vernaaide linten' sampler and features motifs found on the folk costumes of the island of Marken in the Netherlands. An overall placement is provided and the meaning of each motif is explained. This one is a little trickier than others to save and print. I did a right click Save Image As. Be sure to bookmark this link and note when the next part will be available by scrolling down to the bottom of the page. The image below shows the layout of the various parts.


One last SAL project is from Nathalie of Jardin Prive. Each part of this delightful piece is presented as a PDF file with your choice of a Black & White or Color chart! It also comes in a variety of languages. Click this link for the PDF files. You may use your own supplies or order from Jardin Prive.


Happy stitching!

Wednesday, September 11, 2013

Quilt Expo

This last weekend I made the trip to Madison, Wisconsin for the Quilt Expo. (I'm not sure how long this link will work but you can also find info at Nancy's Notions.) I've wanted to go for several years but it just hasn't worked out with my schedule. My daughter and her family live in Madison so I was able to stay with them, and spend some time with my youngest grandchild, in between my trips to the expo.

Your admission to the expo includes the huge vendor area and quilt exhibit. You are also able to take classes and attend lectures for additional fees. I went to four lectures and an afternoon class. The class was on the Cotton Theory technique for quilting as you go. You can find more info on this technique here. The lectures included wet felting, making a t-shirt quilt, working with color and using your stash in quilts.

The quilts that were on display were fabulous. I'll show just a few of them that tickled my fancy.

I love Baltimore album style quilts and there were a number of them on display.


I thought this was a fun way to do a wedding ring quilt. Each ring included beautiful embroidery and embellishments as you can see in the close-up photo.


This was another favorite. There was so much texture added to this one with the multi-layered flowers.


 It was very difficult to take a good photo of this one but I thought it was very unique and well deserving of the ribbon you can see on the bottom right.


If you ever get the chance to attend Quilt Expo it is well worth it!

Next time: a quilted yurt...